Hi ladies just a quick reminder that as the next Hethersett date clashes with the Thetford Craft show we have arranged a new date for Sunday 22nd September.
The date for Aylsham will remain unchanged on 7th September.
Friday, 30 August 2013


Tuesday, 6 August 2013
Cards for August 2013
Hi there ladies hope you are all keeping well & that you enjoyed the recent hot weather we have had. I was fortunate enough to bag 2 weeks off so thoroughly enjoyed it, although I just wished it could have been slightly cooler overnight, as our hotel room registered a whooping 32 degrees at night despite the air con & fan!!!
My 2 cards this month follows a request from our 2 youngest members – Courtney & Chelsea who wanted some cards with butterflies on. I hope you both like what I came up with.
So here goes:

This card has a real 3D effect to it whilst being able to go completely flat for easy posting.
Mat layer 10 x 14.3cm – mine was the new SU colour – Pistachio Pudding (got to LOVE that name) which is a pale green
3 different scraps of coloured card – I used the colour above plus the new SU Coastal Cabana (Blue) & Strawberry Slush (Pink)
White card
Ink to coordinate with one of your scrap colours – mine was Coastal Cabana (Blue)
Sentiment stamp & black ink
Embossing folder
Coordinating ribbon – approx 1cm wide
Stick on Gems
3D foam pads
IF anyone owns the SU Top Note & Beautiful Butterflies dies & don’t mind sharing them could they bring them along as it will speed things up.

Black card mat - 10.2 x 14.5 cm
Newsprint paper - 9.9 x 14.2cm
Acetate
Stazon ink
Butterfly stamps
Promarker pens or similar i.e. Copics, permanent markers - need to be bright colours
Strong clear glue i.e. diamond glaze

extra white card
sheet of patterned paper
A4 silver mirri
A5 matting card (dark)
10 x 6.5 cm picture stamp
sentiment
Archival ink (or similar) mine was coffee
Colouring medium
Blue ink and brushes or sponges
My 2 cards this month follows a request from our 2 youngest members – Courtney & Chelsea who wanted some cards with butterflies on. I hope you both like what I came up with.
So here goes:
Card 1 – All of a Flutter

This card has a real 3D effect to it whilst being able to go completely flat for easy posting.
Supplies needed
C6 base card – mine was blackMat layer 10 x 14.3cm – mine was the new SU colour – Pistachio Pudding (got to LOVE that name) which is a pale green
3 different scraps of coloured card – I used the colour above plus the new SU Coastal Cabana (Blue) & Strawberry Slush (Pink)
White card
Ink to coordinate with one of your scrap colours – mine was Coastal Cabana (Blue)
Sentiment stamp & black ink
Embossing folder
Coordinating ribbon – approx 1cm wide
Stick on Gems
3D foam pads
IF anyone owns the SU Top Note & Beautiful Butterflies dies & don’t mind sharing them could they bring them along as it will speed things up.
Card 2 – Flutter By

Supplies needed
C6 base card- mine was creamBlack card mat - 10.2 x 14.5 cm
Newsprint paper - 9.9 x 14.2cm
Acetate
Stazon ink
Butterfly stamps
Promarker pens or similar i.e. Copics, permanent markers - need to be bright colours
Strong clear glue i.e. diamond glaze
Card 3 – Fun with Snow – if time allows

Supplies needed
white square base cardextra white card
sheet of patterned paper
A4 silver mirri
A5 matting card (dark)
10 x 6.5 cm picture stamp
sentiment
Archival ink (or similar) mine was coffee
Colouring medium
Blue ink and brushes or sponges
Thursday, 11 July 2013
July’s Cards–MERRY CHRISTMAS EVERYONE
Apologises first, I did this blog post at the beginning of the week & have only realised today that none of you could see it & the reason for that was………..
I had saved it to draft rather than uploading it – what a numpty I am…….I really must learn to double check the postings before going on to my next job.
Apologies over with I wish is say a really HAPPY CHRISTMAS in JULY to you all. If any of you saw the Lord Mayor’s parade on Saturday you will have seen how our little celebration is spreading – at least one float was celebrating just that = Christmas in July YIPEE.
I want no excuses for you all not wearing your best Christmas finery this weekend …so dust off those christmas earrings & let the fun begin.
Card 1 – Elfing Around

this was a card i found on the internet & i thought it would be perfect to get us in the Christmas mood. I hope you all like it
Supplies needed
C6 Green Card PLUS extra matching piece
Spare white & red card
Red Glitter card
Stripey patterned paper
Bakers twine/thin ribbon
Card 2 – Robin Redbreast

The robin was again something I found whilst browsing the internet but I have changed the background he is on to one of my own.
Supplies needed
14.5 square cream card
Spare brown, red, black & yellow card
Glitter pen or glue pen & glitter
Black marker pen
White pen
Card 3 – Positive / Negative Christmas Trees
Hopefully there will be time to do both versions of this card
Version 1 – The Posting one

Supplies needed
Sylvia’s design was done in blue so all the matting card/xmas paper/ink were shades of blue
C5 white base card (A4 folded in half)
Christmas paper to cover front
Dark matting card
More white card
Ink and we'll being swirling ink onto our cards so bring your brushes or sponges
Stamps - positive and negative stylistic Xmas trees (about 4 inches) could be done with baubles, etc)
Version 2 – Blinged up

Supplies needed
so another set of the same original items as above plus
A4 sheet of mirri card silver (if working with blue)
round gems plus star gem (if you are using a tree stamp)
and ribbon(I used organza in blue and white)
3d pads
Wednesday, 5 June 2013
June’s Cards 2013
Well hello again ladies, can you believe we are nearly halfway through the year?
At least the nice weather has at last made an appearance. I don’t know about you, but I do find it hard to go to my craft room when the sun is shining & my lovely garden is calling to me…….but I have been good & I have been there so here are this months cards, which mostly have a male theme to them as we have Father’s Day in just over a weeks time.
As Sylvia said in her email the 1st three cards involve using templates so if you wish to strength yours, so they can be reused, you will need to bring some old acetate with you.
Card 1 – For the Office Guy

Supplies needed
C6 white card
Striped paper ( needs to be shirt like)
Coordinating paper to make a tie with
Coordinating card stock & pen - mine were navy
Scrap white card
2 small brads - mine were silver
Pricking tool & mat
Card 2 – Outdoor Man

Supplies Needed
C6 card - mine was blue to match my paper
Checked paper
Coordinating card stock
3 small coloured buttons
4 small brads
Coloured pen to match paper
Card 3 – Saw it

Supplies needed
A4 sheet of white card - strong enough to make card base
Scrap card - brown, dull silver
Patterned paper - mine was text
Black biro pen
Brown ink & sponge dauber
Card 4 – Goosy Goosy Gander

Supplies needed
A6 white base card
plus extra white card enough to cover front of card and punch out daisy and stamp extra image
other card to cover front (mine was orange)
Cherish friendship StampinUp set or background stamp and animal stamp
post it note for masking
ribbon mine was orange gingham just under a cm
Gems - mine were orange
a Stamp a ma jig if you've got one ( unless you're using clear stamps)
Archival ink (or whatever you use that doesn't run) mine was coffee
Your favourite paint medium
Daisy punch
At least the nice weather has at last made an appearance. I don’t know about you, but I do find it hard to go to my craft room when the sun is shining & my lovely garden is calling to me…….but I have been good & I have been there so here are this months cards, which mostly have a male theme to them as we have Father’s Day in just over a weeks time.
As Sylvia said in her email the 1st three cards involve using templates so if you wish to strength yours, so they can be reused, you will need to bring some old acetate with you.
Card 1 – For the Office Guy

Supplies needed
C6 white card
Striped paper ( needs to be shirt like)
Coordinating paper to make a tie with
Coordinating card stock & pen - mine were navy
Scrap white card
2 small brads - mine were silver
Pricking tool & mat
Card 2 – Outdoor Man

Supplies Needed
C6 card - mine was blue to match my paper
Checked paper
Coordinating card stock
3 small coloured buttons
4 small brads
Coloured pen to match paper
Card 3 – Saw it

Supplies needed
A4 sheet of white card - strong enough to make card base
Scrap card - brown, dull silver
Patterned paper - mine was text
Black biro pen
Brown ink & sponge dauber
Card 4 – Goosy Goosy Gander

Supplies needed
A6 white base card
plus extra white card enough to cover front of card and punch out daisy and stamp extra image
other card to cover front (mine was orange)
Cherish friendship StampinUp set or background stamp and animal stamp
post it note for masking
ribbon mine was orange gingham just under a cm
Gems - mine were orange
a Stamp a ma jig if you've got one ( unless you're using clear stamps)
Archival ink (or whatever you use that doesn't run) mine was coffee
Your favourite paint medium
Daisy punch
Wednesday, 8 May 2013
May’s 2013 Cards
Hi everyone hope you all had a great Bank holiday. I unfortunately had to work so missed out on all the good weather that I hear was happening outside.
Well back to this months cards and this month it is all about…………….
TWINKLING H2Os
I will endeavour to enlighten those of you who have never heard or used these little pots of magic and for those of you who do own these beauties then I hope to teach you some new techniques.
So here are this months samples:
Basic Supplies
Twinkling H2Os
Paint brushes
Paper towels
Water mister
Small pot to hold water
Sea salt – NO I’M NOT BRINGING US ALL CHIPS!!!
Card 1 – H2O resist

Supplies
A4 sheet coloured card
White card
Subtle patterned paper
Scallop circle punch
1” circle punch
3/4” circle punch
1/2” circle punch
3D foam
Card 2 – Do you want Salt with that????

Supplies
C6 card blank – needs to match h2o colours
White card
Spare black, light brown & blue card
Coloured gems (or clear)
Background stamp
Grey ink
Black ink
Suitable image stamp
Sentiment stamp
Scrap of ribbon to coordinate with H2O used
Card 3 – A Little more Salt needed???

Supplies
C6 card blank
Black card
White card
Patterned paper
Black ribbon
Thin coloured ribbon
Gems
Hope that all makes sense & see you all at the weekend
Thursday, 11 April 2013
April’s Cards
Hi Ladies here are I am again with this month’s offerings. I have taken on board your various suggestions & this month I have decided to follow a suggestion made by Jeanette, if my memory serves me correctly, who asked that we make some more complicated cards.
Now don’t all start panicking at the word “complicated”, in this context it just means the cards will have a lot more layers & involve several different techniques, hence why I have only 2 cards to show you. I hope that at the end of our sessions you will be pleased with your Finished results.
So here goes with the first card which I’ve called
One for the boys (distress look)
This is similar to a card I found whilst blog hopping & I immediately thought it lended itself to this month’s theme.

This card involves lots of stamping, distressing & layering, as well as stamping on acetate & twill ribbon. With this in mind it would be helpful if you could bring your own stamps & inks.
To help you know what to bring, here are the stamps I used, so anything similar will work. As per usual my stamps/inks will be available for those of you who do not have your own.
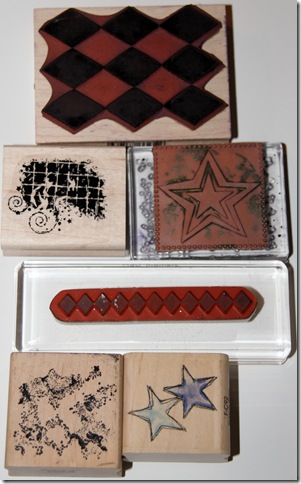
Supply list
14.5cm square base card – mine was red
13cm square piece of navy card
12.5cm square of cream card
Spare card in all of the above
Acetate – mine was 11.5 x 9cm
4 small brads – 3 red & 1 blue
2 silver eyelets
Silver, light blue (SU Bashful Blue), Navy (SU Night of Navy) & light brown (SU Crumb Cake) inks
Black Stazon ink
Stamps similar to those pictured above
Twill ribbon approx 2cm wide
Sponge daubers
Stapler
Distressing tool
The second card is totally different & is one of those cards you give to those special people in your lives. It uses lots of layers again & some Sizzix dies. I also hope to teach you how to make your own paper flowers to embellish the card with (& this is the reason for the lateness of this post, I will explain more at the weekend!)
Card 2 – Special Girlie card (sorry could not think of a better name)

Here is a close up view of the flowers.

Supply List
2 x A4 sheet of Cream card – must be able to make base card therefore not too flimsy
A4 sheet of coloured card - mine was purple
Coloured Paper (not card as stated in email) in at least 2 shades – mine was light, dark & mid purple (in a pearlescent finish)
Coordinating background paper & ink
Plus – matching ribbon (forgot to add this to email)
Flower/leaves punches or dies – I used Stampin up 5 petal flower punch, Boho Blossom punch, Bird punch & some Marianne design dies
Stick on Gems/pearls
Quickie glue pen
Iridescent glitter or stickles
Wet glue – PVA & STRONG
Green card or paper
Looking forward to seeing you all at the weekend.
Now don’t all start panicking at the word “complicated”, in this context it just means the cards will have a lot more layers & involve several different techniques, hence why I have only 2 cards to show you. I hope that at the end of our sessions you will be pleased with your Finished results.
So here goes with the first card which I’ve called
One for the boys (distress look)
This is similar to a card I found whilst blog hopping & I immediately thought it lended itself to this month’s theme.

This card involves lots of stamping, distressing & layering, as well as stamping on acetate & twill ribbon. With this in mind it would be helpful if you could bring your own stamps & inks.
To help you know what to bring, here are the stamps I used, so anything similar will work. As per usual my stamps/inks will be available for those of you who do not have your own.

Supply list
14.5cm square base card – mine was red
13cm square piece of navy card
12.5cm square of cream card
Spare card in all of the above
Acetate – mine was 11.5 x 9cm
4 small brads – 3 red & 1 blue
2 silver eyelets
Silver, light blue (SU Bashful Blue), Navy (SU Night of Navy) & light brown (SU Crumb Cake) inks
Black Stazon ink
Stamps similar to those pictured above
Twill ribbon approx 2cm wide
Sponge daubers
Stapler
Distressing tool
The second card is totally different & is one of those cards you give to those special people in your lives. It uses lots of layers again & some Sizzix dies. I also hope to teach you how to make your own paper flowers to embellish the card with (& this is the reason for the lateness of this post, I will explain more at the weekend!)
Card 2 – Special Girlie card (sorry could not think of a better name)

Here is a close up view of the flowers.

Supply List
2 x A4 sheet of Cream card – must be able to make base card therefore not too flimsy
A4 sheet of coloured card - mine was purple
Coloured Paper (not card as stated in email) in at least 2 shades – mine was light, dark & mid purple (in a pearlescent finish)
Coordinating background paper & ink
Plus – matching ribbon (forgot to add this to email)
Flower/leaves punches or dies – I used Stampin up 5 petal flower punch, Boho Blossom punch, Bird punch & some Marianne design dies
Stick on Gems/pearls
Quickie glue pen
Iridescent glitter or stickles
Wet glue – PVA & STRONG
Green card or paper
Looking forward to seeing you all at the weekend.
Tuesday, 5 March 2013
March’s Cards
Hi Everyone, it only seems like 5 minutes ago when I last updated this blog.
As suggested at our last meeting I’m going to concentrate on specific products that we all have lurking in our crafting spaces. Theses are the products that we had to have when we saw them demonstrated at a craft show or on the TV but that now hardly ever see the light of day.
So with that in mind I’d like you to have a look around & give me some suggestions as to what you would like me to cover in the coming months. If I do not own that product (which I very much doubt 
This month’s product is …….Distress Inks.
I have made 3 cards using only Distress inks & a few stamps. Hopefully you will agree that each card has a different look & I hope to teach you a couple of things that you did not know you could do with them.
Please note that for Hethersett only there is a fourth card kindly designed by Jeanette. Unfortunately I do not have an image but will list the supplies below.
So lets kick off. As per Sylvia’s email there are a few things that are common to each card so rather than list them under each card I have compiled a list & if you could bring them along with you.
Please don’t worry if you do not own any as I will have my supplies with me but a Teflon mat each would be helpful as I can only find 1 of mine at the moment. You can purchase them from the bakery section of Poundland (Riverside definitely have them at the moment)
Common items
- Distress inks - various colours - I used mainly blues, greens, purples & browns
- Teflon sheet
- Mini water mister
- Sponge daubers/ cut & dry foam
- Rubber gloves if you don't like your hands getting dirty
Card 1 – Distress Background & Tag

Supplies needed
- C6 cream card
- Spare cream card
- Background stamp - mine was musical notes
- Embossing ink & clear powder
- Small piece of white vellum
- Sentiment stamp/ peel off
- Brown Stazon ink (only if using stamped sentiment)
- 4 small brown brads
- Scrap of ribbon - colour to coordinate inks used
- 1 normal sized brad
Card 2 - Watercolour Technique

Supplies needed
- 14.5cm Square card - to coordinate inks used - mine was blue, (Marina Mist)
- Cream card
- Spare coloured card - to coordinate with ink colours - mine was lilac, (SU Wisteria,)
- Gold Perfect Pearls
Card 3 - Distress Ink Scene

Supplies needed
- 5" x 7" card - mine was light brown (Crumb Cake)
- Coordinating spare card - mine was blue
- Flower/foliage stamps
- Sentiment stamp/Rub on
- Coordinating ribbons - I used blue & green
- 1 button
Card 4 – Hethersett only – Flower pot Surprise
- 14 cm square card OR 5” x 7” card
- Half A4 sheet pale green card
- Scraps of about 4 other coloured card (for flowers)
OR
- Paper flowers - different sizes work best
- Gems/buttons/card candy to use for flower centres.
- Border punch.
- Stripy or dotty paper plus coordinating piece of ribbon approx. 1cm wide.
- Embellishment or greeting for front of pot (mine was a metal dragonfly.
Subscribe to:
Posts (Atom)